Tuesday, December 31, 2013

Deco Rolls and Other Christmas Baking

Christmas season is baking season, and I took every opportunity to try making new things this year, since it is the first time in a while we haven't escaped overseas. From deco rolls to 3D slot-together gingerbread shapes, my experiments came from ideas that were all over the internet already, but it's the first time I've been able to try making them myself.

Deco Rolls

I'm not sure how I first came across deco rolls, or patterned swiss rolls, but I was immediately impressed. The beautiful designs looked perfect, almost machine-printed, and I couldn't work out how anyone could have made them at home. Using a technique that seems to have been pioneered by the Japanese, it looks so simple once you learn about it that you wonder why you never came up with the idea yourself.

Amazing deco rolls from http://www.pinterest.com/rosafdez/deco-roll-cakes/
It's true that making a deco roll is not that hard. But making ones as amazing as the ones above takes more skill and experience than I had! First, I tried to pipe sponge batter onto a sheet of baking paper. It didn't work too well because I hadn't mixed the ingredients together well and it was lumpy in places, and runny in others. Overall, I found the batter too thin and foamy for me to be able to draw lines with any degree of detail. I then tried to mix cocoa into the rest of the batter, which deflated the whipped egg, and resulted in the thinnest sponge I have ever seen. Total fail.

Next, I tried using a separate (thicker) mixture for the decorations, using the recipe from La Recetas de la Felicidad. This resulted in well-defined lines, and my sponge was fluffy (almost too fluffy), but the problem was that the decorations had a different texture from the sponge, which looked not quite right. Also, I tried to roll the cake up too soon. It steamed up within the baking paper and left a wet layer on the surface.

Freehand design using thicker batter.
Decorations had a different texture from the sponge.
As I did not have time to try again, I simply assembled the swiss roll and covered up the patterning with chocolate ganache. The resulting chocolate log was delicious, though I should have doused it with more kirsch liqueur for more of a black forest flavour.

Deco roll covered in ganache and served as a chocolate log.
Savoury Bread  Wreath

To counteract all the cakes and cookies I was baking, I decided to make something savoury as well. I chose the advent bread wreath recipe from Alice and the Mock Turtle, but instead of filling it with ham and cheese, I used the tomatoes and onion I had on hand. I was tempted to make it red (with tomatoes) on one side and green (with herbs from the garden) on the other, but as I chopped too much tomato, I used it for filling the whole thing.
Plaiting the bread dough over the filling.
The dough browned quickly, as I had used an egg wash with yolk only (left over from making royal icing). I used less cheese than the recipe specified, and regretted it afterwards, though this was tasty anyway. I shouldhave formed the dough on the baking sheet instead of trying to move it after shaping, but despite the wreath falling apart during transportation, I was happy with the outcome.

Bread wreath after baking.
Gingerbread Cookies for Hanging on the Tree

You've probably made gingerbread cookies since you were children. My parents were not bakers, so I didn't get around to this till later, and this was the first time I had tried to string them together for hanging on the tree as well.

Gingerbread tree decorations.
Gingerbread Cookies for Hanging on the Edge of your Cup

You can purchase cookie cutters specifically designed for making cookies that hook onto the edge of your cup, such as the hookie cookie cutters from Hoobbe, Wilton's Xmas-themed milk and cookies cookie cutters, or the Over the Edge cookie cutters. But really, it's not that hard to cut your own cookies. Some of your existing cookie cutters will probably already do the trick, for instance if you have a candy cane one. Or you could simply add a slot into a shape afterwards, or make minor tweaks like bending your gingerbread man's arm.

Over the Edge cookie cutters with a slot for your mug.

My hanging gingerbread cookies.
Stained Glass Cookies

Believe it or not, I've been collecting those Air New Zealand lollies for years, for making stained glass cookies. Rather than crushing the candy though, I just put whole chunks in to bake. For a while it did not look like it would work, but finally, the sweets melted (apart from the one in the tree at the top of the picture below). I thought these looked great, but I would probably prefer to just eat gingerbread on its own.

Stained glass cookies.
3D Cookie Stack

You may have seen the stacks of gingerbread stars that people form into trees. As I did not have lots of star cutters in different sizes, I went for making a stack of circles into a bell instead. I didn't have lots of circle cutters either, but I did have a bunch of cans, measuring cups and measuring spoons in various sizes.

Cutting shapes for making a 3D gingerbread bell.

3D gingerbread bell hanging on the tree.
3D Slot-Together Gingerbread Shapes

You'd think making cookies that slot together into 3D shapes would be really easy, once you had designed them in cardboard and checked that all the slots are in the right places. It turns out it is easier said than done, because the cookies will rise a little while baking. Make a slot too narrow, and you won't be able to slide another biscuit between it; you run the risk of breaking your cookie if you try to cut it wider after baking. Make a slot too wide, and the shapes don't fit in snugly, so your final product does not sit straight, unless you glue it together using royal icing, holding it in the right place until it sets.

If you don't have cookie cutters like the cuties from Suck UK, it can take forever to trace around all your cardboard shapes with a sharp knife as well. So you can imagine my sense of achievement when I finished making the reindeer and sleigh gingerbread shapes below. It took me several days to construct and decorate the pieces, and I lost several reindeer through carelessness (I started off with six of them), but I was pretty pleased when I got to the end.


Hope you had a great Christmas, and Happy New Year!

This post is part of Our Growing Edge, a monthly blogging event aimed at inspiring us to try new things. This month, it is hosted by Leah from Sharing The Food We Love.

Wednesday, December 18, 2013

Unexpected Food-Related Gifts

I am a notoriously difficult person to buy presents for. If I want something, I will generally get it myself. If I don't have it, I probably don't want it. So when we finally had our housewarming party the other week (which coincided with my birthday), I was surprised by what amazing presents my family and friends managed to buy for us. Not counting edible gifts like bottles of wine, we received...

Drink Glassware

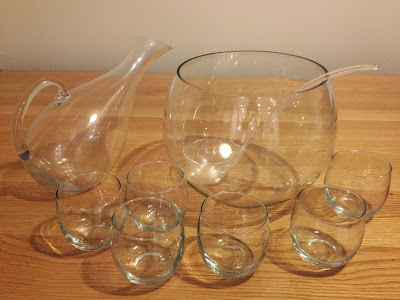
Our previous place was so tiny we did not even have a dining table. Not surprisngly, we also did not have much in the way of  glassware for drinks. We put the punch bowl to use straight away, making mojito with mint from the garden.

Wine decanter and punch bowl set.
Serving Set

We received souvenir serving utensils, a tea towel and an apron from Budapest. These were probably made in China, and I am not sure why the Hungarian man on the spoon handle looks like he is wearing a sombrero, but actually, these came in pretty handy.

Serving utensils, tea towel and apron (not pictured).
Chopping Boards and Knife

We have plenty of chopping boards already (with some spare ones to act as pot stands), as well as a good chef's knife, but I love the new chopping boards we were given, including one made out of recycled kauri, as well as a sharp santoku knife. The kauri board feels so beautifully smooth that we would never actually cut anything on it, but use it as a serving platter instead.

Chopping boards and santoku knife.
Steamer

As with chopping boards, a steamer was something we already had, but the one we received as a gift was bigger and shinier. Now asparagus spears will be able to fit in whole!

Larger steamer than we currently have.
KitchenAid Stand Mixer

I love baking, but it always takes me hours, especially if there is any creaming of butter involved. The 15-year-old K5SSWH KitchenAid mixer we got would take care of that, as well as any whipping or kneading duties. Apparently, this mixer was used in a catering business and is one of the indestructible, heavy models. We also promptly bought ourselves a grinder attachment, so we can make proper mince ourselves, rather than buying the cheaper stuff from the supermarket. Nothing beats chopping your meat by hand, but this is less work for a decent result.

KitchenAid mixer from the 80s, with additional grinder attachment.
Cook Books

I am not a big fan of recipe books, but ones that tell you a bit about a culture, or the history of a food, is definitely my cup of tea. I only wish there were an easy way to keep track of all the recipes and information I come across.


Quick Pop Maker

When I first saw the Zoku Quick Pop Maker, my first thought was "Oh great, another piece of plastic junk to clutter up our new place". It turns out this uncharitable thought was unjustified, because this is no simple ice block mould. Once you have chilled the pop maker overnight in the freezer, you can make your ice blocks in as little as 7 minutes. This ability to freeze your ingredients quickly allows you to do all sorts of creative things, from making ice blocks with wavy stripes, to ones with a different coloured shell. You can even stick fruit or candy in precise locations on the side of your ice block. A great one for the kids!

---

We told everyone not to bring anything, so we certainly weren't expecting gifts, let alone ones that we would want. We are lucky indeed to have people around us who are not only generous, but almost know us better than we know ourselves!

Saturday, November 30, 2013

Fresh Tomatillos

A year ago, I had never heard of tomatillos. Then I came across some Mexican recipes using them, and started noticing tinned ones in the supermarket.

Tinned tomatillos at the supermarket.
Natually, I assumed this was a foreign produce that could not be grown in New Zealand. You can imagine my excitement when I spotted tomatillos for sale at a market in Auckland, along with some amazing-looking heirloom tomatoes.

Heirloom tomatoes and tomatillos grown in Clevedon.
While the pictures on the tins make tomatillos look like green tomatoes, it turns out they are a bit like cape gooseberries as well, with the fruit covered by a papery husk. I was surprised at how waxy the skin was underneath. If these little green balls had not had their natural wrapping, I might have assumed that the retailer had resorted to some special techniques for enhancing the appearance of their product.

Tomatillos look like a cross between green tomatoes and cape gooseberries.
In terms of texture and flavour, I found the tomatillos to be firmer and crisper than red tomatoes, and significantly more sour. Rather than trying to eat them raw (apart from a wee sliver for curiosity's sake), I thought they would be much more enjoyable cooked, as in fried green tomatoes. Since tomatillos are a Mexican ingredient though, I decided to try making salsa verde instead.

Apparently, tomatillos are more commonly boiled, but I chose the pan-roasting method for a tastier dip.

Pan-roasting the tomatillos.
 I also gave some vine tomatoes a similar treatment to make a salsa roja (roasted red salsa) for comparison.
Salsa roja and salsa verde.
Both were delicious, and not just eye-catchingly different in colour, but also in flavour (the green tomatillo one was more tart, as you would expect, with a crisper taste than the cooked tomato one). You could make this for your Christmas feast and serve with corn chips, tortillas, or grilled meats, and if you have leftovers, this would be great for the Mexican breakfast dish of huevos divorciados ("divorced eggs").


This post is part of Our Growing Edge, a monthly blogging event aimed at inspiring us to try new things. This month it is hosted by Becky from My Utensil Crock.

Thursday, November 28, 2013

Favourite Recipes: Christmas Caramel Crunch

I know, I know, I've been sharing a lot of recipes lately, and it's really about time for a restaurant review or something. But when a workmate brought these crunchy chocolate caramel slices in, and I found out how easy these moreish mouthfuls were to make, I decided they would be perfect to include as part of the Sweet New Zealand monthly blogging event.

Caramel crunch with a variety of toppings.
The last time I wrote a post intended for the event (I was too late with the entry), I made chocolate cheese fudge. It turns out a savoury component works a treat in desserts. In the case of this caramel crunch recipe, the secret ingredient is... wait for it... Salada crackers!

Not surprisingly, I've seen this addictive invention labelled Christmas crack. I prefer to watch people's reaction to these little bites before they know what is in them, so I avoid using names that give the game away, like soda cracker chocolate candy, salty caramel and chocolate crackers, or saltine cracker brickle. Instead, I'll call them caramel crunch barschocolate toffee bark or salted toffee chocolate squares.

There are any number of variations, not just in the name, but also in the toppings. You can add nuts, dried fruit, flaky sea salt, or more sweet and/or crispy things, like broken pretzels, hundreds and thousands, chopped M&Ms or mini marshmallows. They are also great with no toppings at all, as in David Lebovitz's Chocolate-Covered Caramelized Matzoh Crunch. As it's coming up to Christmas though, a white chocolate, pistachio and cranberry version seemed most appropriate. You could also try cutting these into triangles to make them more tree-like.

Christmas Caramel Crunch
Recipe similar to another one which appeared in Dish Magazine (Dec 2010/Jan 2011).

1/2 packet of Salada crackers (1 sleeve, 9 large squares, 36 small squares, or 125g)
250g butter
1 cup brown sugar
300g white chocolate buttons
1/2 cup chopped pistachios
1/2 cup dried cranberries

Method
  1. Line a sponge roll tin with baking paper and place a single layer of Salada crackers in the bottom of the tin.
  2. In a saucepan, heat butter and sugar over medium heat and bring to a boil for 3 minutes. Pour over crackers.
  3. Bake at 180°C for 8 to 10 minutes.
  4. Remove from oven and sprinkle chocolate over the crackers as soon as pan comes out of the oven. Allow to melt (around 5 minutes), then evenly spread the chocolate with a knife. Sprinkle the pistachios and cranberries over the melted chocolate.
  5. Allow to cool and then break into pieces.
What is a sponge roll tin?
It is a rimmed baking sheet. If you don't have one, and end up using a rectangular cake tin as I did, you'll only be able to fit two-thirds of the crackers in, so you'll need to adjust the other ingredients accordingly.

I only had a rectangular cake tin, which wasn't able to hold all the crackers.
Can I use other kinds of chocolate?
You can use compound milk chocolate instead of white chocolate, or even dark chocolate buttons, but I would advise against bittersweet chocolate with 65% cocoa or higher. You want the caramel flavour to shine in these toffee pieces, and a strong chocolate taste would overwhelm this. I also noticed that white chocolate seemed to have a lower volume than its browner counterpart, so you would need less of the milk chocolate in weight, say only 200-250g.

Caramel poured on, and baked, then chocolate buttons melted over the top.
How long do I need to cool this for after adding the toppings?
It can take 2 to 3 hours for this to cool completely at room temperature, so that the chocolate fully sets. You can also also put this into the refrigerator to make it properly brittle before chopping.

Crispy Christmas caramels.

[Added 20 December 2013: If you want to jazz it up a bit, take a look at the latest caramel chocolate crackers from Dish, which adds booze the caramel.]

This post is part of Sweet New Zealand, a monthly blogging event for New Zealand bloggers to share something sweet. This month it is hosted by Mairi from Toast.

Monday, November 25, 2013

Honey Pineapple Piña Colada Boats

This week is apparently New Zealand's first ever National Honey Week! Organised by Airborne Honey, the initiative aims to raise awareness and support for this natural resource from 25 November to 1 December, including having a "Make Something Yummy with Honey" competition. I've been making far too many desserts this month already, but with an amazing prize up for grabs (a behind-the-scenes experience with Geoff Scott at Vinnie's, in addition to a dinner for two, a cookbook and of course plenty of honey), I just had to participate.

A housewarming party in the weekend left us with an abundance of fruit, so I decided to make a glazed pineapple dessert. I based my recipe on one for pan-fried pineapple, with the boat presentation inspired by a dessert I ordered in Italy. I also had some homemade coconut ice cream  from my previous attempt at making my own coconut milk, which came together with the fruit to form a beautiful hot-and-cold tropical delight.

Honey pineapple piña colada boats.

A taster insisted there must have been alcohol in it, although I didn't use any; such was the aroma and depth of flavour this dessert had. Perhaps it was because the pineapple and coconut flavour combination reminded him of a piña colada. If I were to make this again, I would definitely add a splash of rum, and drizzle some caramel over the top (I've added this into the recipe below)!

Honey Pineapple Piña Colada Boats
Based on pan-fried pineapple and banana flambe recipes.

1 small, ripe pineapple
2 Tbsp (28g) butter
2 Tbsp (42g) honey
1/4 cup rum
coconut icecream, to serve

Preparation

  1. Cut pineapple lengthwise into quarters.
  2. Peel back the woody core from the bottom up, leaving it still attached at the leafy end.
  3. Cut the pineapple wedge about 1 cm from the skin, to remove the juicy flesh.
  4. With a toothpick, pin back the core to form a "sail".
  5. Slice flesh into thick pieces.

Pineapple boats with flesh extracted.
Cooking

  1. In a pan, mix butter and honey together over high heat. Cook for 2 minutes, until the mixture becomes golden.
  2. Brown the pineapple pieces, about 2 minutes on each side.
  3. Remove from heat and arrange the fruit slices onto the pineapple skin boat.
  4. Add rum to the pan and return to medium heat.
  5. Warm for a few seconds without stirring, then carefully tilt the pan so the rum ignites (if using an electric stove, hold a lit match near the sauce to ignite it).


Browning the pineapple slices.
Assembly

  1. Place a scoop of ice cream next to the pan-fried fruit slices on the pineapple skin boat.
  2. Drizzle the flaming sauce over the top.
  3. Serve immediately and enjoy!

Thursday, October 31, 2013

Recreating Perfection: Homemade Egg Tofu (自製蛋豆腐)

Whenever I have ordered a homemade tofu at a restaurant, be it at Bunga Raya, Homeworld, Grand Park or Bei Jing Restaurant, I have never been disappointed. Deep-fried to perfection, with a hot, smooth, and custardy centre, this comforting food brings joy to young and old alike. With only two main ingredients—soy milk and egg (even though the menus often don't mention the egg, opting for a more mysterious-sounding "chef's special tofu"), and an additional bit of seasoning—it turns out this dish is not even that hard to make.

Egg Tofu at Homeworld BBQ Restaurant.
There are a variety of recipes out there. For 500mL fresh soy milk, I have seen recipes using up to 7 eggs (I am not counting Elsie's recipe using 12, as she is really making savoury steamed egg custard rather than egg tofu), as well as some with as little as 2. Some add chicken stock powder, many add cornstarch, and you can make the tofu paler in colour by using more egg whites too (I was very impressed by how tender and smooth this tofu looked, and it seems to have steamed evenly all the way through, even though it is quite thick!)

While most recipes call for 6 eggs to 500mL soy milk, I decided to try out Amy Beh's recipe on Kuali.com, which only uses 5 eggs. The simple instructions looked like this:
500ml fresh unsweetened soya bean milk
5 eggs
3/4 tsp salt
1 tbsp cornflour

Line a 20cm square tray with cellophane paper or cling wrap.

Beat eggs lightly and add soya bean milk, salt and cornflour. Mix well with a fork and strain the mixture into the prepared tray.

Cover the tray with cling wrap and steam over low heat for 20 minutes or until cooked. Remove from the heat and leave to cool.
Naturally, I ignored the part about using cling film (eww, I don't want molten plastic on my food, thanks!) and just steamed the mixture in a little pot instead. At this point, I understood the mistakes I made. By not putting some sort of covering over the top (I would pick baking paper next time), I let a "skin" form on the surface.

Yellow film formed on top after steaming.
And by using a small steamer dish rather than the 20cm square tray specified, I ended up trying to cook a very tall piece of tofu. While the centre was perfect, the top was still runny, and the bottom had that honeycomb texture you see in overcooked egg. It was probably not helped by the fact that our gas stovetop doesn't really do low heat. Next time, I would also try steaming in a wok rather a Western-style steamer, so that the condensation on the lid does not drip onto the tofu.

Silky smooth after I poured away the liquid upper half.
Honeycomb texture on the bottom (now flipped to the top for viewing).
After cutting the refrigerated egg tofu into squares, I fried it in a wok, trying to simulate a deep-fryer effect by constantly spooning hot oil over the top. It didn't cook evenly, with the softer side puffing out more than the dryer side, but I didn't care about looks. Although I couldn't quite achieve a crispy outer shell, the centre of my egg tofu squares was everything I had wished for, soft and silky and delicious.

Homemade egg tofu, cut into squares and fried.

Impressively soft and silky centre.

Yes, there was an element of fail in my experiment. But nothing could keep me from the feeling of triumph that came with eating my fried egg tofu.

[Added 9 May 2015: I agree with a fellow blogger's recommendation to use less salt (thanks, Audrey!). Also, I found it heaps easier to make this using a square disposable cake pan, not only because I could cut it open without disturbing the tofu, but also because all my metal steaming dishes were round, which isn't so useful when you want to make squares!]

A Note on Soy Milk

You can make your own soy milk by soaking, blending, draining and boiling the beans. However, if you want to go for the easy option, purchase a bottle of unsweetened soy milk from your nearest Asian grocer. The ingredients listed should only be soy beans and water. Do not try to use the Western-style soy milk that has been processed to taste more palatable to those used to cow's milk. For instance, Vitasoy's "original" soy milk has been flavoured with barley, sugar, salt, oil and kelp, in addition to an unspecified natural flavouring. The So Good "regular" soy milk contains only 3.5% soy protein, and again has added sugar, oil, various minerals and vitamins, and flavouring.

The brand of soy milk I chose had this label. It came in a plastic milk bottle with a blue top, in the refrigerated section of the supermarket.

Chinese soy milk good for making egg tofu, amongst other things.


This post is part of Our Growing Edge, a monthly blogging event aimed at inspiring us to try new things. This month it is hosted by Alice from Nom Nom Cat.

Monday, September 30, 2013

Wacky Wonders (or, Chocolate Cheese Fudge? For Real?)

Things have been more than a bit hectic over here. We've just moved into our new house, one of our cats is sick (and needs to be coaxed into eating her foul-tasting pills twice a day), and work is in overdrive, with plenty of long hours including a sleep at work one evening. We've been cooking and eating out as much as ever; I just haven't found the time to blog about things, until I've waited so long that I've lost the inspiration. If you are interested, you can see a more timely update of what we've been up to on my Facebook page.

Poaching free range chicken breast for the sick animal.
Along with our new house comes the new experience of cooking with gas. It's amazing how quickly the stovetop heats things up, but frustratingly, it seems to be pretty difficult to cook at a low temperature, even when we place a spacer underneath the pot. When we tried to slow-cook beef bones and salmon frames into palatable jellies for the cat, we couldn't get the stock to simmer; it was at a furious boil for hours. When we made chili con carne using the unseasoned boiled mince the cat rejected, we managed to burn food on the sides of the pot. And the oven is so well insulated that it not only comes to temperature in a matter of minutes, we can barely smell whatever it is that is being baked. It takes some getting used to, our new kitchen, but it is an improvement on the one at our old flat.

The secret to a delicious chili, we've decided, is the addition of a bit of cocoa powder and a rich, flavourful sugar. We used malt syrup this time, but molasses sugar is also great, and other people add a square of chocolate instead. We also managed to use up the jar of pickled jalapeños that has been sitting in our fridge (a small triumph—the pickled cucumbers left over from our burger making experiments are next in the firing line).

Which brings us to what we tried making after that (hint: the title of this post gives the game away already). Now, I've seen some pretty wacky ingredients in my time. For vegans, I have produced a chocolate mousse tart using tofu, and a buttercream frosting made of avocados, the green colour of which makes me think it really ought to taste like mint, especially if you are pairing it with chocolate cake. Both of the above tasted of their respective ingredients, mainly because I couldn't bring myself to add as much sugar as it would take to drown the flavours out. Bean brownies are not so odd, if you are used to Asian bean-based desserts, and I am all geared up to try pizza with a cauliflower crust. I can understand why you might use unusual ingredients if you have dietary restrictions, but when I came across chocolate cheese fudge, I was astounded.

Chocolate cheese fudge.
I know people use cheese in desserts. In fact, I love cheesecake in many different forms. But we are not talking about cream cheese here. We are not even talking ricotta or mascarpone. What the recipe calls for is processed cheese, which you can't even buy in blocks anymore in New Zealand! Fortunately, we had some individually wrapped slices in the fridge, again left over from making hamburgers. Unfortunately, we only had one plain slice; the rest were smoked (or rather, smoke-flavoured). Seeing as putting cheese into fudge sounded ridiculous anyway, we ploughed on ahead.

Melting together the processed cheese with butter.
As you might expect, the processed cheese was rubbery and didn't really want to mix with the melted butter. But although it seemed like far too much icing sugar for the amount of yellow goo, the resultant crumbly mixture compressed into an oily Play-Doh-like clump, which set in the refrigerator into a smooth, firm block of fudge.

Mixing the cheese into cocoa and icing suagr.
Unsuspecting tasters thought the fudge was delicious, but commented it was saltier than usual, like salted butter caramels. On being told it contained processed cheese though, the reaction was generally one of disgust. And the smokey flavour is obvious once you know about it. When I shared a post about cross-cultural food preferences last week, a friend who opened a Western restaurant in China commented that his customers loved fruit pizza (yes, with cheese, and lashings of chocolate sauce!), although they would often eat around the cheese on the purely savoury pizzas. Who's to say what's weird, as long as it tastes good? What unusual recipes have you come across?

This post is part of Our Growing Edge, a monthly blogging event aimed at inspiring us to try new things. This month it is hosted by Marnelli from Sweets and Brains.

Friday, August 30, 2013

Messing with Mastic

Tears of Chios. Napoleon in Love. It all sounds terribly dramatic, doesn't it? Actually, what I have been up to recently (apart from being too overwhelmed by new eateries to write about any of them), is to try out a recipe that uses up a) a few more pieces of the mastic gum that has been sitting at the back of my fridge, b) all the egg yolks I had left over from trying to imitate Domain & Ayr's 20-minute souffle pancake, and c) a jar of rose petal jam that was forgotten about for far too long.

The "tears of Chios" part refers to droplets of mastic gum, a plant resin produced from the mastic tree. The Ancient Greeks used it as chewing gum as well as to flavour wines, and during the Ottoman rule of Chios (a Greek island famous for its mastic production), it was apparently worth its weight in gold.

A box of mastic (in large tears) from Chios.
The resin can be difficult to work with. Once you get it on a stainless steel pot, it is nearly impossible to remove, a bit like the sticky polymerised mess you get if you've baked oil into a jelly in the oven. And like Blu-Tack, it softens when warmed up, so you can imagine the challenge you are faced with when your recipe tells you to grind the stuff. Diane Kochilas recommends grinding mastic with a pinch of salt or sugar, but what I found much easier was to freeze the resin pieces until they are hard, then put them in a plastic bag and bash them with a rolling pin.

Tip 1: Keep mastic away from your pots and pans, at least in its soft and sticky form.
Tip 2: Rather than grinding the resin with a mortar and pestle, freeze and smash it into powder.

In terms of flavour, I found mastic to be a potent taste of pine resin: fresh and green, yet also very dominating. You only need a tiny bit to realise it is there! Most recipes I found use it in desserts, though apparently the Egyptians use it for savoury dishes as well. It must be a pretty common ingredient in that part of the world, because there is even a recipe for almond and mastic gum cake from Nestle Egypt.

The recipe I tried out was for making "napoleons in love". I had no idea what this was supposed to be at first, but I came to realise that "napoleon" is another term for what I knew as mille-feuille, and the love part comes from the use of pistachios and rose, as well as the shape of the final pastries.

Assembled "napoleons in love", only a quarter of the recipe here, if that.
Making these sweet treats is relatively easy, but there are quite a few steps involved. You can make both the mastic-flavoured custard filling and the pistachio praline ahead of time, then on the day you want to serve these, bake the flaky pastry and assemble everything. I thought it was quite misleading that the recipe states it makes 4 napoleons though. I had enough filling and topping to pair with 4 sheets of frozen puff pastry. Perhaps these hearts were supposed to be much bigger than I had cookie cutters for?

I did have a bit of drama in the kitchen, though nothing too disastrous. I decided to be lazy and skip the steps of straining the pastry cream and cooling it in an ice bath. Only when I realised the custard was starting to separate did I whisk everything back together and cool it quickly.

Tip 3: Follow the steps in the recipe. Straining the custard will give you a smoother texture, and cooling it in an ice bath will help it set and not separate.

The custard was not as smooth as it could have been.
When making the pistachio praline, I had trouble getting the sugar to dissolve in the tiny amount of water specified. Oh well, I thought, the granules will probably disappear once I heat everything up. I can help it along by stirring it. I was wrong.

The bubbling syrup still had sugar crystals in it.
Take a look at what I ended up with, instead of a golden-coloured syrup!

I was left with sugar granules after the water evaporated.
Fortunately, all was not lost. I added more water to the pot, this time properly dissolving the sugar, then gently heated it again, without stirring, until it caramelised to a rich brown. I then poured this over my toasted pistachios.

Tip 4: To make molten sugar candy, make sure the sugar is completely dissolved in the water, and do not stir while heating, to avoid crystalisation.

Making of pistachio praline.
Perhaps I should have let the molten candy cool ever so slightly first, because some of it flowed away from the nuts before hardening. The next day, I discovered what had become a brittle solid had now absorbed moisture from the air, and was getting soft and sticky again. My solution this time was to dry the pistachio praline in the oven, chop it up as soon as it cooled, and store it in an airtight container.

Tip 5: Make sure you store your praline in an airtight container, to stop it getting soft and sticky.

Baking the pastry shells sounded like the easiest part of the recipe. Unfortunately, even using store-bought puff pastry, I had a dose of fail, because the baking sheet I placed on top was too light to stop my shapes from puffing up too much, sometimes unevenly.

Heart-shaped pastries: before and after baking, then brushed with rose jam and sprinkled with praline.
Tip 6: If you don't want your puff pastry to rise too much while baking, place a baking sheet over the top, and weigh it down with a roasting pan or similar.

Finally, it was time to assemble all the parts. Heating the rose petal jam made it runnier and easier to remove the flower petals, but I don't think I should have added water to it, because the praline did not stick very well to the pastry using such a thin "glue".

Rose petal jam.
Apart from the heart shapes, I tried putting whole sheets of puff pastry together. While this was more efficient time-wise, I did have trouble cutting the dessert into pieces without squeezing out the custard filling or flattening the pieces in the middle.

The squares in the middle got a bit squashed.
And the verdict? Not everyone will like the taste of mastic (the pine fragrance can be reminiscent of cleaning fluids) or rose (which in large quantities can make it feel like you are eating pot-pourri), but if you don't have an aversion to these ingredients, you will fall for "napoleons in love". This dessert has a balanced mingling of flavours, and a variety of textures, from the crunchy/chewy praline to the flaky pastry to the soft custard. Try it and see for yourself!


This post is part of Our Growing Edge, a monthly blogging event aimed at inspiring us to try new things. This month it is hosted by Marija from Palachinka.
Related Posts Plugin for WordPress, Blogger...