Saturday, January 30, 2016

Averting a Pita Panic

My first attempt at making sourdough pita bread was so successful that I decided to invite the whole family over for a BBQ, where I would impress them with my baking skills. What I didn't count on was getting different results every time I tried making pita bread since then.

Rescue Mission #1: Pita Chips

To prepare for the gathering, I tried a recipe which required less sourdough starter, and used a mix of wholemeal and white flour. I impatiently started baking without waiting for the dough to fully double in size, and also pulled the rounds out of the oven after a shorter amount of time to stop the bread getting dry.

Smaller bubbles that did not join into a pocket.

Not surprisingly, these "pitas" did not rise much, and I wasn't entirely sure whether they were fully cooked.

Not much rising going on here, and the colour didn't look right.

Before giving up altogether, I rolled the final dough ball thinner than usual, let the oven heat for longer, and managed to make a large pita pocket. This would be a good option for someone wanting a lower carb pita sandwich, but the thinner bread did go stale more quickly that the thicker ones I made earlier.

In this batch of dough, thinness worked better.

I sliced up the rest of the bread into triangles, brushed them with olive oil, sprinkled salt and pepper over them, and baked them until golden.

Pita chips made from bread that did not rise well.

These pita chips were a great accompaniment to my homemade hummus!

Pita chips with homemade hummus, garnished with olive oil and sumac.

Rescue Mission #2: Manakish Za'atar or Pizza

Although my bread did not puff up into what I would consider pita, I suspected that I just didn't let the dough rise enough. The results weren't really that bad, and I was sure I could get it right next time. I set about trying to produce more sourdough starter quickly, taking it out of the fridge and letting it sit on the kitchen counter. Unfortunately, I left my starter out too long (well over a day), and after making plenty of bubbles, it seemed to have been taken over by some other organisms. After feeding it a couple of times in blind optimism, it turned into a runny goo with no elasticity, which also didn't smell quite right. It was not going to recover in time for the BBQ, so I turned to Plan B: using store-bought yeast.

The recipe in the New York Times called for 2 teaspoons of yeast, but I only had just over 1 teaspoon left in the cupboard. I figured that wouldn't be a problem, as long as I let the dough rise long enough. I tried rolling it thinner, since that helped last time, but I still ended up with several air pockets rather than one large one, more like naan than pita.

Naan-like bubbles.

Perhaps it was because I rolled the dough out in plenty of flour, taking away the moisture that's needed so the steam can do its work. Perhaps the pizza stone under the baking sheet simply wasn't hot enough yet. In any case, it wasn't working.

I had mixed up some za'atar as we had too much thyme in the garden (though it's probably not the right kind of thyme to use). I sprinkled it now over the dough discs, after brushing them with olive oil.

Bread topped with olive oil and za'atar.

Fresh bread is always delicious anyway, even when just seasoned and brushed with olive oil, but the manakish za'atar was a tasty and novel option.

My manakish za'atar.

By changing the toppings, you could also make some mini pizzas.

Crispy, thin pizzas from pita dough.

Of course, I went and bought more yeast after this trial run - I still intended to make pita bread for people, after all.

Rescue Mission #3: Flour Tortillas

I prepared a lot of dough for our BBQ, just to be on the safe side. Inevitably, there was more of it than people could eat, and our fridge was already full from all the meats and salads that were left over, so the unused mixture sat at room temperature for more than a day. In hindsight, I should have just baked all of it, and put the leftover pitas in the freezer (they defrost easily in the toaster, and will even puff up again if they did so originally). However, when you are entertaining guests, there are other things you want to do with your time.

The excess batch of dough had risen, then deflated, and now smelt rather alcoholic. It was also quite wet, so I added plenty of flour to bring it back to the right consistency. I rolled balls of dough into thin discs to make something like flour tortillas, and cooked them over a hot, dry, cast iron frying pan.

Small bubbles would develop across each round of dough, which is probably when you want to flip it to cook the other side, then transfer it to a plate covered with a tea towel, simultaneously keeping it warm and moist.

Little bubbles on the flatbread.

If you cook it for longer, the small bubbles may join up into a large bubble, essentially giving you pita bread, but then you run the risk of burning part of it, as I did in the video below (fast forward through and the bubble growth looks like magic):


Thin pita pocket in a pan.

These rounds of bread still tasted a little sour and alcoholic, but if you eat them with some flavourful fillings, it's not going to be a problem!

Flatbread with dips and salads: hummus, toum, baba ghanoush, muhammara, tabbouleh and a tomato salad.
Taquitos with refried beans, grated cheese, avocado and tomato salsa.

Other Ideas

I haven't tried these yet, but I imagine you could also easily turn your dough into gözleme, Chinese spring onion pancakes, and the like. Have fun!

Wednesday, January 20, 2016

A Meal in Brief: Saan

We came here because we had read glowing reviews about this northern Thai (Lanna and Isaan) restaurant in Ponsonby.

The menu was printed on one page, with four sections which the waiter explained were like starters, small sharing plates, larger dishes, and sides. Everything looked different from what we have seen in other Thai restaurants—where were the spring rolls and numerous curry options? Or white jasmine rice for that matter? Is this what it means to eat northern Thai?

The setting was beautifully fitted out, as one would expect from a Cheshire Architects design, with ceramics made in Thailand by an artisan potter. The sun came in through the slats of venetian blinds, illuminating a bit of smoke, giving the room a hazy atmosphere.

Beautiful restaurant fitout.

At the back of the restaurant was an open kitchen area, where you could see the chefs preparing the meals.

Open kitchen area.

The service was flawless, with our water topped up discreetly and regularly. Staff were available when you wanted them, without being overly attentive. When our larger dishes arrived, we were given a little bowl of cucumber, cabbage and crushed ice as a palate cleanser—a nice touch!

Weeping Butterfly cocktail and caramelised pineapple shrub.

What we ate included:
  • Theu Kha Kho (deep fried taro cakes and tofu, chilli dipping sauce and peanuts, $12) - while the taro cakes were surprisingly firm and dense (probably more rice flour than taro), the tofu triangles were fried to perfection, crisp on the outside and moist and soft inside.
  • Pak Som (house pickled seasonal vegetables, $8) - a mix of stir-fried cabbage, dark greens and pickled vegies, this side dish had a tangy flavour and reminded us of something we've had at Chinese restaurants.
  • Somtum Phu Plarah (pickled crab and spicy green papaya salad, tomatoes and snake beans, $14) - this version of a papaya salad came with hard and salty crab legs for sucking on, but was somehow less exciting than the other items we tasted.
  • Miang Jin Nuea (semi cured beef on perilla leaves with peanuts, toasted coconut and tamarind chilli jam, $15) - it was good that we could see the fried shallots, fresh chilli slices, coconut flakes and chopped peanuts, because once you wrapped everything in a leaf, it became a more mellow blur of flavours.
Clockwise from left: Theu Kha Kho, Pak Som, Somtum Phu Plarah, and Miang Jin Nuea.

  • Sai Ua (Lanna pork sausage with aromatic spices and kaffir lime with young green chilli paste, $15) - unlike any other sausage we'd tried before, the kaffir lime flavour came through clearly in this dish recommended by the waiter. The accompanying Vietnamese mint leaves, chopped shallots and green chilli paste added extra aroma and freshness. Well worth trying.
Sai Ua - Lanna pork sausage.

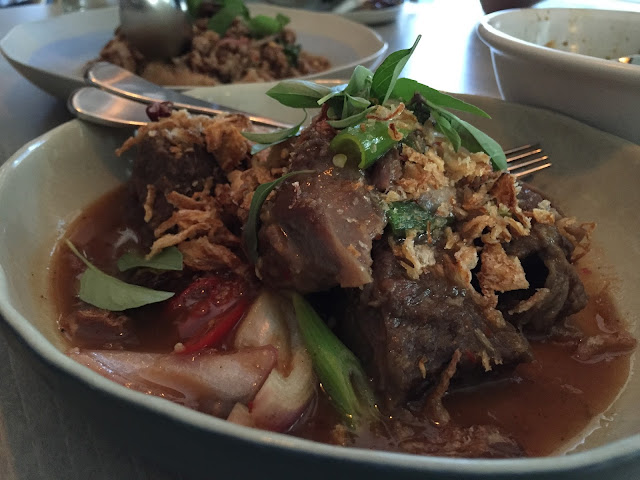
  • Gaem Wua Sarm Ros (twice cooked beef cheeks with spicy pickled chilli and tamarind sauce, $26) - we enjoyed the beef cheeks in its sour and spicy sauce, but there was a lot more meat there and they could easily have cut back on it.
Gaem Wua Sarm Ros - beef cheeks.

  • Larb Ped (wok seared spicy duck and mint salad with ground toasted rice and fried kaffir lime leaf, $25) - this was the best larb we have had, with a fatty duck mince complemented by the minty, spicy dressing, and garnished with crunchy fried duck skin.
Partially eaten Larb Ped - warm duck and mint salad.

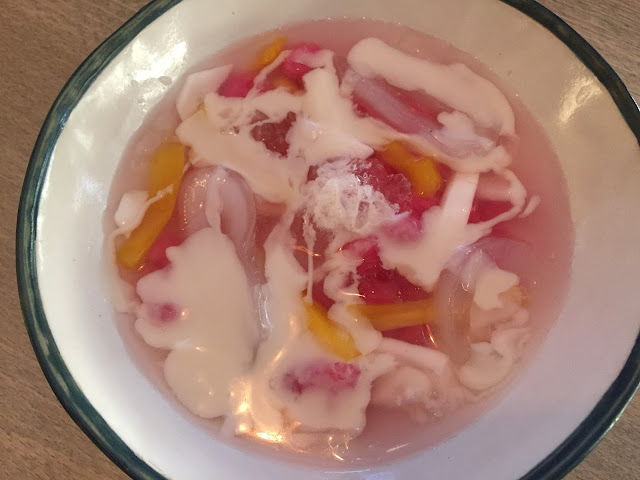
  • Tub Tim Grob (caramelised water chestnuts, palm fruit, jackfruit, and young coconut meat in jasmine and rose syrup, topped with smoked coconut milk, $12) - drizzled with coconut milk at the table, this delicate and floral dessert was thankfully relatively light and a great way to end our meal.
Tub Tim Grob dessert.

Overall, Saan is almost certainly the best Thai restaurant in Auckland today. The food is exquisite, particularly the larger dishes we sampled, playing confidently with flavour, texture and presentation, and making good use of fresh herbs (though we were tempted to pluck some more Vietnamese mint from a pot plant next to our table). We can't wait to come back again.

Restaurant Details

Saan
160 Ponsonby Road, Ponsonby, Auckland
(09) 320 4237

Opening hours:
Mondays to Tuesdays 5pm till late
Wednesdays to Sundays 12pm till late

Friday, January 1, 2016

Auckland Diner's Diary: December 2015

Happy New Year everyone! There are so many posts I haven't got around to writing, but at least I have my monthly restaurant update ready for you. As usual, please let me know of any other interesting openings/closings/news that I may have missed.

Trucking Along


Central City Openings


City Fringe Feeds


Other


Coming Soon


Closed


[Added 21 January 2016:

Events

]

Sunday, December 13, 2015

Red Kidney Bean Aquafaba Meringues

My dad was, and probably still is, the very opposite of wasteful. He had a bucket in the shower to collect the cold water before you got in, and used it later for flushing the toilet. He'd put on more clothes, rather than turning on the heater. Food scraps would be eaten where possible, or else taken out to compost.

It pains me just as much to throw food away, which is why I have experimented with eating carrot tops, and cooking with sourdough starter which no longer smelt right. The other night, I made a chili using tinned red kidney beans, and suddenly recalled reading about a recent discovery involving the bean liquid: named aquafaba, it turns out the thick and frothy brine can be whipped up just like egg whites!

While chickpea water has the most neutral flavour, I decided to try making meringues with the red kidney bean liquid I had on hand. What started out as a reddish-brown gloop became paler as it aerated in the food processor.

Red kidney bean liquid before whipping.

The original recipe from Goose Wohlt only calls for 1/2 cup sugar and the liquid from one can of beans, but I didn't seem to be able to get the ingredients to form stiff peaks, so I added cream of tartar and vanilla as well, based on the recipe from Kids with Food Allergies. It took me half an hour to realise I had left the food processor blades in, before switching to the whisk attachment.

Mixture became pale and thick after whipping.

Using the egg whisk gave a much fluffier result, but I still couldn't get the mixture to form stiff peaks, and my food processor was getting hot. I went ahead and spooned the whipped concoction onto baking paper and put it in the oven anyway.

Any peaks disappeared quickly.

Depending on which recipe you pick, you are supposed to bake the meringues at 100C/200F for 1.5 hours120C/250F for 40 minutes, or use a mix of temperatures. I baked mine at 100C for 1 hour, then turned off the oven and left them inside overnight.

Baking the aquafaba meringues.

Because I didn't put my meringues into an airtight container in a timely manner, I baked them again the next day to dry them out properly. You need to wait for them to cool first, not just to avoid the moisture being trapped in the storage box, but also because they are soft and sticky while warm—I tried pulling one off the baking paper straight away and the bottom stuck, but those which I removed after cooling slid off effortlessly.

Aquafaba meringue stuck to baking paper while warm.

I'm not sure why the surface of my meringues seemed to have little circles on them, but the result was light and crunchy. Overall, I think they were actually closer to hokey pokey than meringues, because they stuck to your teeth when you ate them, and there seemed to be a bit of malt or caramel flavour.

The aquafaba meringues were light and crunchy.

Breaking the crunchy bits over fresh strawberries and coconut yoghurt greatly reduced the teeth-sticking, and made a tasty vegan and gluten free dessert.

Aquafaba meringues with strawberries and coconut yoghurt.

Apparently, aquafaba can be used to make a variety of different (vegan) dishes, such as:

You can also use it as an egg substitute (including as egg wash) by replacing each egg in many recipes with 3 Tbsp aquafaba.

I was pleased with how my meringues turned out, and amazed by their transformation from a slimy liquid into light and crunchy pillows. I would be tempted to retry these with chickpea brine, and see how aquafaba works in savoury recipes as well. No more tipping bean liquid down the drain—my dad would be pleased!


This post is part of Our Growing Edge, a monthly blogging event aimed at inspiring us to try new things. This month, it is hosted by Jazzmine from Dash of Jazz, with a theme of Nostalgia.

Wednesday, December 2, 2015

Auckland Diner's Diary: November 2015

Inner City Eats


City Fringe Openings


A Little Further


Shore Things


New in New Lynn

The new Brickworks dining lane in New Lynn has a bunch of new restaurants:
[Added 2 March 2016: Also Elegance Chinese Restaurant opened near the train station.]

Other


Coming


Closed

The block of shops on Wellesley Street containing Saika and Homeworld BBQ has been forced to close as cracks have been found in the building.


Events


Tuesday, November 3, 2015

Auckland Diner's Diary: October 2015

Food Trucks Galore


Central City Eats


A Facelift in Town


City Fringe Openings


Savouring Sandringham

  • Saattveek - vegetarian store offering food from Maharashtra and Gujarat, part of where Jai Jalaram Khaman used to be
  • Eggs & More - Indian style egg and paneer dishes, including "Indian road side delicacies", in the other half of where Jai Jalaram Khaman used to be

Cafe Culture

Sweet Treats and Bready Delights


A Drink or Two


Coming soon 


Events

Saturday, October 31, 2015

Homemade Sourdough Pita Bread

It's funny how one thing leads to another. I was looking for recipes to use up the excess thyme we have in the garden, and came across Bint Rhoda's za'atar bread. From there, it was only a link away from khubiz arabi cooked in a cast iron pan, which inspired me to compare it to pita bread.

My homemade sourdough pita bread.

Susan's pita bread on her Wild Yeast blog looked amazing, seemed pretty simple to make, and used up a lot of sourdough starter, so I decided to go with her recipe. I generally try to follow the instructions carefully, the first time I make something, but I discovered I didn't have quite as much starter as I thought, which meant I ended up only using 320g of it rather than her rather exact 376g.

It became too late for baking, so I put the dough into the fridge, where it sat for 2 days before I had time to do anything with it. To bring it back to the right temperature, I transferred it, in its covered bowl, into a warm water bath in the kitchen sink. Unfortunately, some water got into the bowl, and I hastily patted the dough dry with a paper towel. Fortunately, that was the last of the mishaps I encountered.

I divided the dough into balls, flattened each one to a few millimetres thick, put two or three of them onto a baking sheet, and slid everything onto a pre-heated pizza stone in the oven. It didn't take long before the bread started puffing up!

Dough rolled out into flat rounds.

Starting to puff up.

Bigger bubbles.

Conjoined bubbles.

It was a lot of fun watching the dough rise in the oven, sometimes with multiple bubbles joining up into a giant air pocket. I was worried that it may not be fully cooked through, so left the bread in the oven for a few extra minutes, which made the pitas a little dry.

I used to wonder how bakers got the holes into pita bread. Who knew it would be so simple? You can and should experience the magic too, whether you choose to use supermarket yeast or a sourdough starter!

A pita pocket.


This post is part of Our Growing Edge, a monthly blogging event aimed at inspiring us to try new things. This month, it is hosted by Kerene from The Dream Baker.
Related Posts Plugin for WordPress, Blogger...