Tuesday, December 31, 2013

Deco Rolls and Other Christmas Baking

Christmas season is baking season, and I took every opportunity to try making new things this year, since it is the first time in a while we haven't escaped overseas. From deco rolls to 3D slot-together gingerbread shapes, my experiments came from ideas that were all over the internet already, but it's the first time I've been able to try making them myself.

Deco Rolls

I'm not sure how I first came across deco rolls, or patterned swiss rolls, but I was immediately impressed. The beautiful designs looked perfect, almost machine-printed, and I couldn't work out how anyone could have made them at home. Using a technique that seems to have been pioneered by the Japanese, it looks so simple once you learn about it that you wonder why you never came up with the idea yourself.

Amazing deco rolls from http://www.pinterest.com/rosafdez/deco-roll-cakes/
It's true that making a deco roll is not that hard. But making ones as amazing as the ones above takes more skill and experience than I had! First, I tried to pipe sponge batter onto a sheet of baking paper. It didn't work too well because I hadn't mixed the ingredients together well and it was lumpy in places, and runny in others. Overall, I found the batter too thin and foamy for me to be able to draw lines with any degree of detail. I then tried to mix cocoa into the rest of the batter, which deflated the whipped egg, and resulted in the thinnest sponge I have ever seen. Total fail.

Next, I tried using a separate (thicker) mixture for the decorations, using the recipe from La Recetas de la Felicidad. This resulted in well-defined lines, and my sponge was fluffy (almost too fluffy), but the problem was that the decorations had a different texture from the sponge, which looked not quite right. Also, I tried to roll the cake up too soon. It steamed up within the baking paper and left a wet layer on the surface.

Freehand design using thicker batter.
Decorations had a different texture from the sponge.
As I did not have time to try again, I simply assembled the swiss roll and covered up the patterning with chocolate ganache. The resulting chocolate log was delicious, though I should have doused it with more kirsch liqueur for more of a black forest flavour.

Deco roll covered in ganache and served as a chocolate log.
Savoury Bread  Wreath

To counteract all the cakes and cookies I was baking, I decided to make something savoury as well. I chose the advent bread wreath recipe from Alice and the Mock Turtle, but instead of filling it with ham and cheese, I used the tomatoes and onion I had on hand. I was tempted to make it red (with tomatoes) on one side and green (with herbs from the garden) on the other, but as I chopped too much tomato, I used it for filling the whole thing.
Plaiting the bread dough over the filling.
The dough browned quickly, as I had used an egg wash with yolk only (left over from making royal icing). I used less cheese than the recipe specified, and regretted it afterwards, though this was tasty anyway. I shouldhave formed the dough on the baking sheet instead of trying to move it after shaping, but despite the wreath falling apart during transportation, I was happy with the outcome.

Bread wreath after baking.
Gingerbread Cookies for Hanging on the Tree

You've probably made gingerbread cookies since you were children. My parents were not bakers, so I didn't get around to this till later, and this was the first time I had tried to string them together for hanging on the tree as well.

Gingerbread tree decorations.
Gingerbread Cookies for Hanging on the Edge of your Cup

You can purchase cookie cutters specifically designed for making cookies that hook onto the edge of your cup, such as the hookie cookie cutters from Hoobbe, Wilton's Xmas-themed milk and cookies cookie cutters, or the Over the Edge cookie cutters. But really, it's not that hard to cut your own cookies. Some of your existing cookie cutters will probably already do the trick, for instance if you have a candy cane one. Or you could simply add a slot into a shape afterwards, or make minor tweaks like bending your gingerbread man's arm.

Over the Edge cookie cutters with a slot for your mug.

My hanging gingerbread cookies.
Stained Glass Cookies

Believe it or not, I've been collecting those Air New Zealand lollies for years, for making stained glass cookies. Rather than crushing the candy though, I just put whole chunks in to bake. For a while it did not look like it would work, but finally, the sweets melted (apart from the one in the tree at the top of the picture below). I thought these looked great, but I would probably prefer to just eat gingerbread on its own.

Stained glass cookies.
3D Cookie Stack

You may have seen the stacks of gingerbread stars that people form into trees. As I did not have lots of star cutters in different sizes, I went for making a stack of circles into a bell instead. I didn't have lots of circle cutters either, but I did have a bunch of cans, measuring cups and measuring spoons in various sizes.

Cutting shapes for making a 3D gingerbread bell.

3D gingerbread bell hanging on the tree.
3D Slot-Together Gingerbread Shapes

You'd think making cookies that slot together into 3D shapes would be really easy, once you had designed them in cardboard and checked that all the slots are in the right places. It turns out it is easier said than done, because the cookies will rise a little while baking. Make a slot too narrow, and you won't be able to slide another biscuit between it; you run the risk of breaking your cookie if you try to cut it wider after baking. Make a slot too wide, and the shapes don't fit in snugly, so your final product does not sit straight, unless you glue it together using royal icing, holding it in the right place until it sets.

If you don't have cookie cutters like the cuties from Suck UK, it can take forever to trace around all your cardboard shapes with a sharp knife as well. So you can imagine my sense of achievement when I finished making the reindeer and sleigh gingerbread shapes below. It took me several days to construct and decorate the pieces, and I lost several reindeer through carelessness (I started off with six of them), but I was pretty pleased when I got to the end.


Hope you had a great Christmas, and Happy New Year!

This post is part of Our Growing Edge, a monthly blogging event aimed at inspiring us to try new things. This month, it is hosted by Leah from Sharing The Food We Love.

Wednesday, December 18, 2013

Unexpected Food-Related Gifts

I am a notoriously difficult person to buy presents for. If I want something, I will generally get it myself. If I don't have it, I probably don't want it. So when we finally had our housewarming party the other week (which coincided with my birthday), I was surprised by what amazing presents my family and friends managed to buy for us. Not counting edible gifts like bottles of wine, we received...

Drink Glassware

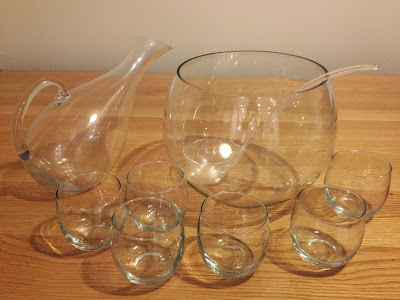
Our previous place was so tiny we did not even have a dining table. Not surprisngly, we also did not have much in the way of  glassware for drinks. We put the punch bowl to use straight away, making mojito with mint from the garden.

Wine decanter and punch bowl set.
Serving Set

We received souvenir serving utensils, a tea towel and an apron from Budapest. These were probably made in China, and I am not sure why the Hungarian man on the spoon handle looks like he is wearing a sombrero, but actually, these came in pretty handy.

Serving utensils, tea towel and apron (not pictured).
Chopping Boards and Knife

We have plenty of chopping boards already (with some spare ones to act as pot stands), as well as a good chef's knife, but I love the new chopping boards we were given, including one made out of recycled kauri, as well as a sharp santoku knife. The kauri board feels so beautifully smooth that we would never actually cut anything on it, but use it as a serving platter instead.

Chopping boards and santoku knife.
Steamer

As with chopping boards, a steamer was something we already had, but the one we received as a gift was bigger and shinier. Now asparagus spears will be able to fit in whole!

Larger steamer than we currently have.
KitchenAid Stand Mixer

I love baking, but it always takes me hours, especially if there is any creaming of butter involved. The 15-year-old K5SSWH KitchenAid mixer we got would take care of that, as well as any whipping or kneading duties. Apparently, this mixer was used in a catering business and is one of the indestructible, heavy models. We also promptly bought ourselves a grinder attachment, so we can make proper mince ourselves, rather than buying the cheaper stuff from the supermarket. Nothing beats chopping your meat by hand, but this is less work for a decent result.

KitchenAid mixer from the 80s, with additional grinder attachment.
Cook Books

I am not a big fan of recipe books, but ones that tell you a bit about a culture, or the history of a food, is definitely my cup of tea. I only wish there were an easy way to keep track of all the recipes and information I come across.


Quick Pop Maker

When I first saw the Zoku Quick Pop Maker, my first thought was "Oh great, another piece of plastic junk to clutter up our new place". It turns out this uncharitable thought was unjustified, because this is no simple ice block mould. Once you have chilled the pop maker overnight in the freezer, you can make your ice blocks in as little as 7 minutes. This ability to freeze your ingredients quickly allows you to do all sorts of creative things, from making ice blocks with wavy stripes, to ones with a different coloured shell. You can even stick fruit or candy in precise locations on the side of your ice block. A great one for the kids!

---

We told everyone not to bring anything, so we certainly weren't expecting gifts, let alone ones that we would want. We are lucky indeed to have people around us who are not only generous, but almost know us better than we know ourselves!
Related Posts Plugin for WordPress, Blogger...